3D printer control boards have a “power stage” designed to heat the machine’s bed (the heated bed) in a regulated way (the power sent is controlled by chopping the current with a component called a MOSFET).
You’ll find plans online for hot wire CNC machines that use these boards by connecting the wire straight to the heated bed’s MOSFET output (the wire replaces the bed’s heating element).
The problem is that this stage is usually designed for 12 V (older boards) or 24 V (more recent boards). At those voltages, the available power only allows fairly short wires and low speeds, which can limit what the machine can do, especially cutting EPP or extruded polystyrene (XPS) at useful widths.
For a versatile 4-axis machine, the ideal is rather to supply the wire with 48 V.
The appeal of a single board and a single power supply
The motor drivers on modern 3D printer boards handle 24 V. So with a heated bed that also takes 24 V, you can have a single 24 V power supply, with everything managed by a single electronic board (usually fairly compact, which doesn’t hurt).
It’s appealing because it’s simple. And it works in a demonstration: a bow that isn’t too long, a snail’s pace, expanded polystyrene (EPS).
But if the goal is a truly versatile machine, cutting extruded polystyrene and EPP at reasonable speeds, it is often disappointing. Even with a fairly narrow table (as I recommend here), it can fall short.
What counts: power per centimetre of wire
What vaporises the material is the energy dissipated per centimetre of wire. At a fixed voltage, the longer the wire, the higher its resistance and — at the same time — the lower the current: doubling the length of the wire divides the power per centimetre by four.
It depends a little on the wire’s diameter and resistivity, but roughly, with the usual wires, 48 V is comfortable up to 0.9 to 1 m of wire. Beyond that it becomes marginal, especially for cutting EPP or extruded polystyrene (XPS).
How do you build a versatile machine?
To get around this problem, the electronics have to become a little more complex:
- Separate the motor power supply (12 or 24 V) from the wire power supply (48 V)
- Use:
- Either a single board that manages the motor and heating supplies separately and accepts 48 V on the heating side (but that’s rare)
- Or a small add-on heating board, which picks up the heating control pulses from the main board (this signal is called PWM). Example below with the BTT SKR Pico v1.0 board, for which I provide a firmware adapted to HotWire4X and the wiring instructions.
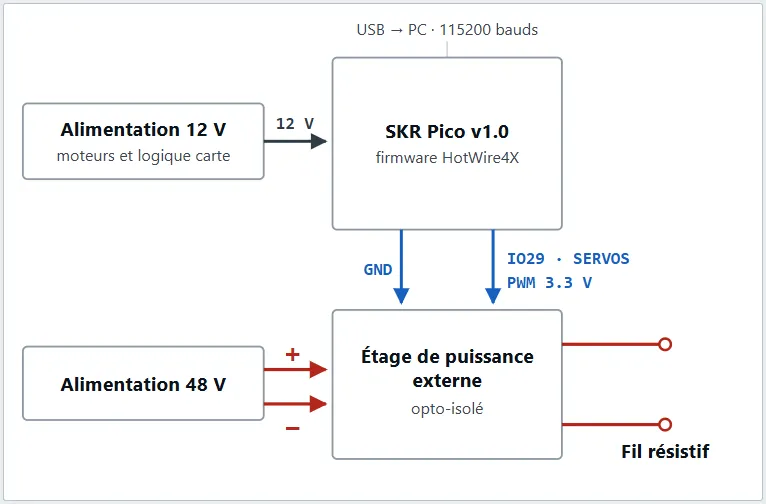
With the right components, such a setup also isolates the heating from the board’s microcontroller (the microcontroller is protected from any current coming back from the heating side; it is called opto-isolated).
And for a small machine?
For a machine with a fairly short wire, heating managed by the board, with a single power supply, is enough.
I’ve built (and sold) several machines of this kind, the first one in 2004.
For them, I also publish a firmware for the BTT SKR Pico v1.0 board. It is adapted to HotWire4X, and uses the board’s own power stage to heat the wire.
Can 48 V do it all?
In other words: does it make sense to supply a short wire with 48 V?
Well, no. The risk is melting the wire if you run it at full power.
The shorter the wire and the higher the supply voltage, the greater the risk.
Fortunately, HotWire4X includes a heating power limit: the PWM signal is capped so that it never exceeds a value you set with a simple procedure when configuring the machine:
- you start at 10% heating,
- then you slowly increase it until the wire turns dark red (“cherry red”): that’s the limit,
- you save that value with your machine settings.
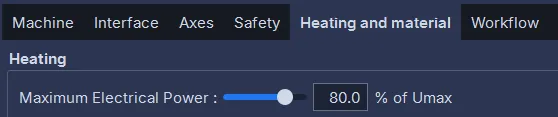
This heating power limit works for any hot wire CNC machine, but if it forces you to cap the heating at 25% of the electrical power, you’ll lose resolution, and your heating value will lack precision during cuts.
So match your wire’s supply voltage to its length: 12 or 24 V for a narrow machine, 48 V for a versatile machine.