7.1 The materials library
A material brings together four numbers: the cutting speed, the heat, the kerf at that speed (kerf V) and the kerf at half that speed (kerf V/2). They depend on the material, but also on the machine, on the wire and on the cutting quality you are after: this is why a material has a name and a context, and why you can have “EPS fast” and “EPS precise” for the same polystyrene.
Materials are saved in the materials.json file of the Datas folder (chapter 2). Four system materials are always present, with starting values to refine: Expanded, Extruded, EPP and Depron, in the @default context. They cannot be modified or deleted; you create your own alongside them.
7.1.1 Choosing a material
The Material list of the Cutting tab banner (chapter 5) shows each material in the form Name @context (speed mm/s - heat %), in four groups separated by a line: the materials of the active machine, the general materials, those of the other machines, then the system materials. Choosing a material loads its four values into the sliders. The chosen material is remembered in the project. An undo in the Design tab does not change it, and a wing panel keeps it when it is transferred again (chapter 8).
When a file is opened, or documents are imported, whose material is missing from the library (deleted, renamed, or created on another computer), the Material not found window names it, in the form Name @context. The Cutting tab then uses Expanded @default instead: choose the right material there, or create this one (floppy-disk button, then Create new). Saved as it is, the document then keeps Expanded.
7.1.2 Creating, updating, renaming, deleting
The sliders of the banner never modify a material. To save values, the floppy-disk button, to the right of the list, opens the Edit material window.
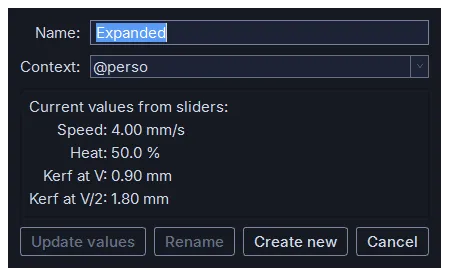
- Name: short, to stay readable in the list (the speed and the heat are added automatically). The names of the four system materials are reserved.
- Context:
@general, or the pseudo of a machine. The default context is that of the active machine (@generalwhen the active machine is a template, chapter 6): this is the right habit, as a material calibrated on one machine is not necessarily valid on another. - Current values from sliders: the four values of the sliders, as they will be saved.
- Update values: writes the slider values into the selected material. The button is only active if the name and the context of the form are those of this material, and never on a system material; for a material of another machine, first set its context back in the list.
- Rename: changes the name or the context without touching the values.
- Create new: a new material with the slider values, which becomes the selected material. If the name already exists in this context, a suffix is offered.
- Cancel closes the window without changing anything.
The × button, to the right of the floppy disk, deletes the selected material after confirmation; it is grayed out on a system material. The operation cannot be undone.
When a material is opened from a system material, the proposed name is given a suffix (“Expanse_1”), with the suffix already selected so that it can be replaced in one go from the keyboard.
7.2 Calibrating a material
Calibration gives the cutting conditions that produce parts with exact dimensions. It is a step to carry out for each new material, and for each cutting speed you want to use with it.
7.2.1 Principles
The wire melts a kerf along its way; at a reasonable speed, it does not touch the material, which vaporizes in front of it. To get the final dimension, the wire must be offset by half a kerf from the path (chapter 5).
During a cut, the chosen speed is the maximum speed in the material: on a four-axis cut, the side that travels the longer path moves at this speed and the other side moves more slowly, with the same heat, and therefore melts a wider kerf. HotWire4X compensates for this from two measurements, the kerf at speed V and the kerf at V/2, and with the variable offset algorithm.
HotWire4X does not use a “heat line”: each material records exactly one speed-heat pair. To use another speed, you calibrate a second material under another name.
7.2.2 Equipment
A small block of the material to calibrate (120 × 60 × 45 mm is more than enough), a caliper, the machine connected, the wire stored at the origin.
7.2.3 The procedure
Calibrate Materials, in the Cutting tab banner, opens the advanced guillotine (chapter 5), unticks Account for kerf and shows a summary of the procedure, “Material calibration — summary”. In the Calibration frame of the advanced guillotine, Summary shows it again and Detailed explanations opens the long version in a window that can stay open while you work.
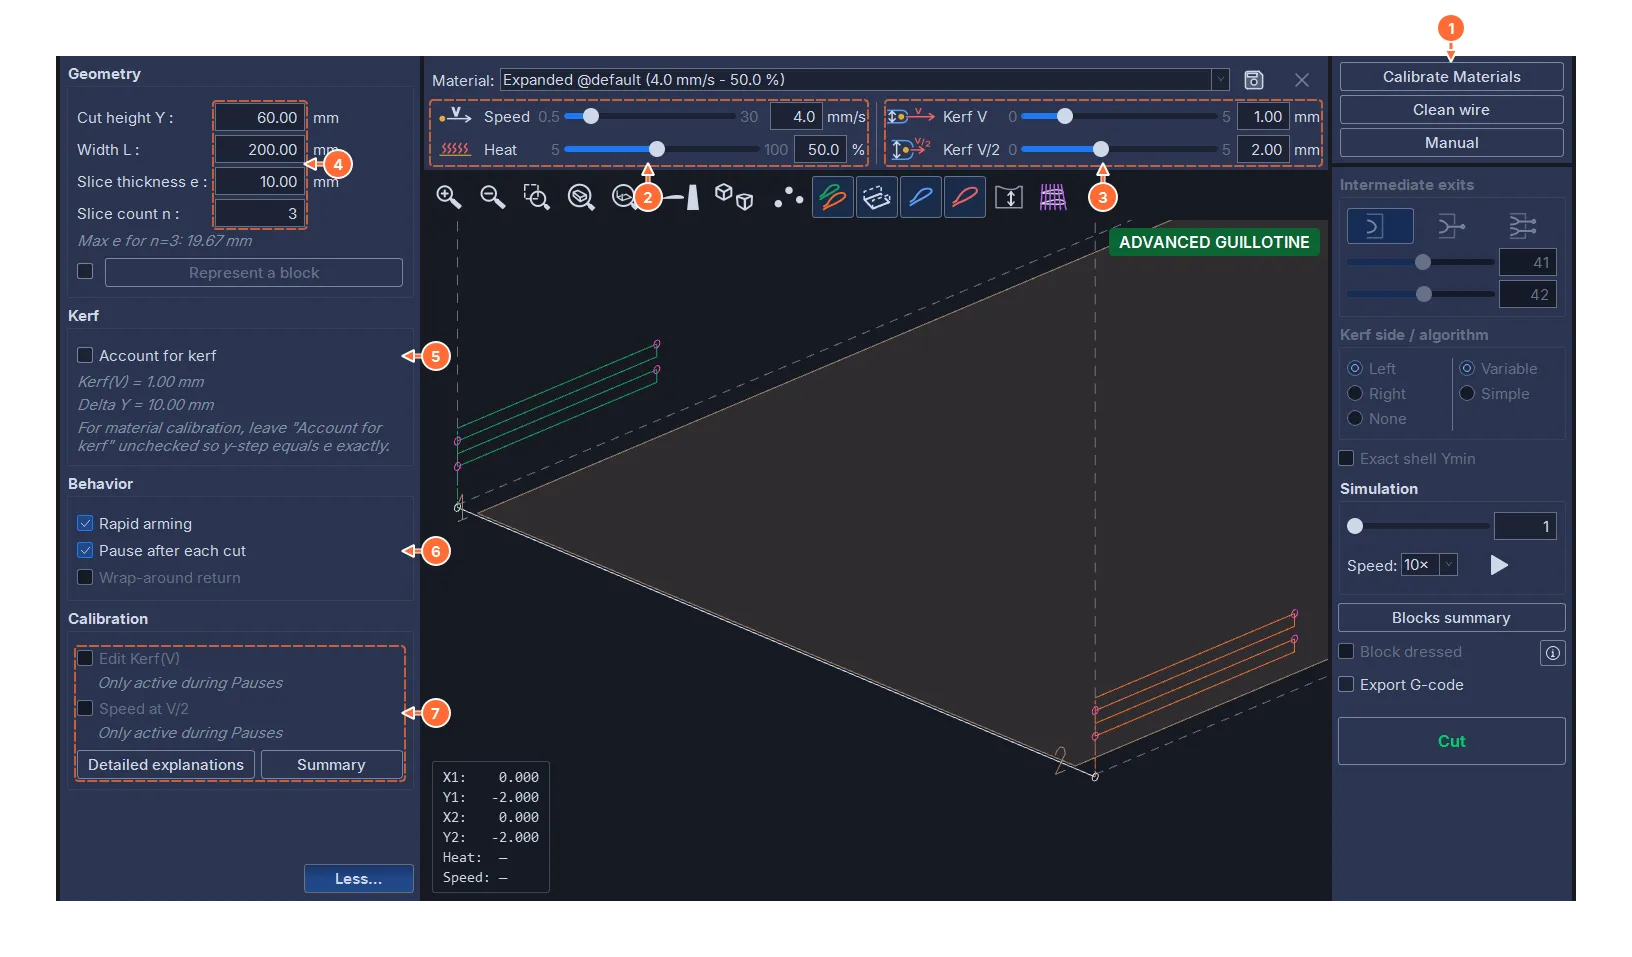
- Calibrate Materials opens the advanced guillotine and shows the summary of the procedure.
- The Speed and Heat sliders of the banner: the speed to calibrate, and the heat you adjust during the cut.
- The Kerf V and Kerf V/2 sliders, where you enter the measurements.
- Geometry: the cut height Y, the width L, the slice thickness e and the number of slices n.
- Account for kerf, unticked by Calibrate Materials.
- Pause after each cut.
- Calibration: Edit Kerf(V) and Speed at V/2, active only during a pause, then Detailed explanations and Summary.
Account for kerf must stay unticked throughout the procedure: the vertical step between two traverses is then exactly the slice thickness e, and the kerf is deduced from the actual thickness of the slice.
-
Choose the cutting speed. A few starting values: 4 mm/s for an expanded or extruded polystyrene of medium density; 6 mm/s for a low-density polystyrene; 1 to 2 mm/s for a quality cut or a difficult material (EPP: 2 to 3 mm/s). Set the Speed slider of the banner.
-
Determine the heat. Set the advanced guillotine for three or four slices of about 10 mm (Y at the height of the block, L a little wider than the block, e = 10, n = 3), tick Pause after each cut. Set the heat high (90 %), start the cut, and lower the heat while the wire is moving (on a GRBL interface, with the −5, −0.5, +0.5, +5 buttons that replace the heat slider during the cut), in small steps from one slice to the next, until you get a kerf of about 1 mm or less, without the wire dragging the material. Cut a last slice at constant heat to get a flat top on the block. This heat no longer changes until the end.
-
Measure the kerf at V. After a complete slice cut at constant heat, the wire stops (pause after each cut). Measure the actual thickness E of the slice: kerf V = e − E. For example, e = 10 mm and E = 9.1 mm give 0.9 mm. In the Calibration frame, tick Edit Kerf(V): the Kerf V slider of the banner is unlocked; enter the value there. For more accuracy, cut several slices and divide the height of the stack by their number.
-
Measure the kerf at V/2. Still during the pause, tick Speed at V/2: the following slices will be cut at half the speed, with the same heat. Resume. On a GRBL interface, Resume only appears once the new speed has been confirmed by the board; without confirmation after 5 seconds, the “Speed not confirmed” window offers Retry, Back to V or Stop the cut (chapter 5). After the next slice, the wire stops; STOP stops the cut, then, in the “Cut stopped” window, Go back to the origin brings the wire back to the origin or ((Close (abandon the cut))) leaves it where it is (chapter 5). Measure the slice E’: kerf V/2 = e − E’. It is wider than at V (for example 10 − 8.1 = 1.9 mm). Once the cut is finished, enter the value in the Kerf V/2 slider.
-
Save the material. The floppy-disk button, then Create new, with a short and explicit name: “EPS 20 kg fast”, “XPS blue precise”, “EPS floor 35 kg”. The proposed context is the active machine.
The new material appears in the list with its values. To correct it later, select it, adjust the sliders, then click the floppy-disk button and Update values.